cntr: 90.55 90.13 90.14 90.34 90.34 90.24.
Then at 5 micron, 4 wets for 20 minutes, MOT/TOT alterating
cntr: 90.34 90.24 90.34 90.24 90.14 90.14
And then to 3 micron "to save polishing time" says Gordon, for 20 minutes. "but don't let it dry, and if the tool gets sticky STOP." I did 4 wets with alternate MOT and TOT. I saw one small ding, did 2 minutes MOT at 3 micron and got most but not ALL of it.
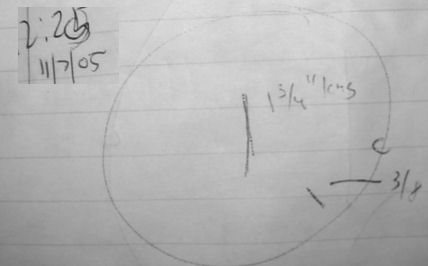
12:12PM I did 5 micron for 10 minutes MOT 2 wets, and 3 micron 10 minutes 2 wets MOT, and got rid of the pit but then got a big scratch down the center of the mirror, 1-3/4 inches long; and a 3/8" scratch. I decided to use 5 micron to remove them. After 5 minutes of 5 micron TOT 1 wet I checked, and the scratches were not much better AND there was a 3/4-inch scratch. I knew at that point to quit, as it was getting very late (1AM), I was VERY annoyed, and I all I knew was that I was doing something wrong.
Scratch remediation I
Nov 21-22 2005:Following my Nov 7th ATM session above, where my fine grinding put scratches in my mirror, I concluded that the big scratch was during removal of the mirror at the end of the wet. In talking to Gordon about this, and reading on the Web and in the usual classic books, I found it was a common experience to scratch during fine grinding. I've summarized that discussion and readings in a seperate document.
Gordon suggested at the time to go back to a grit appropriate to the depth of the scratch (12 or 25 micron) and grind it out; and then do the finer grits again to work the surface; but to be careful in removing the mirror from the tool at the end of those sessions. (Again, details and other considerations are in my "scratch" document.)
8PM: Gordon inspected my large scratch and prescribed "12 micron until the scratch is removed; then 10-20 minutes at 5 micron and at 3 micron". At 8:30PM I did about 27 minutes of 12u to remove the big scratch but I got two little ones. I figured 10 minutes of 12u would remove those, so I did that and immediately went to 5u (24 min) and 3u (17 min) without inspection.
Unfortunately, I ended up with several small scratches, clustered together along the edge of the mirror. This suggested to Gordon there was some problem with the tool. Sure enough, one of my edge tiles which had cracked was loose and a corner of it came off with little effort. Also, the size of the corner matched the widths of the scratches, confirming the problem. As other tiles were too close to the edge, I honed them with my diamond honing tool. Then I washed the tool under running water while carefully scrubbing with a toothbrush to clean the debris.
At 11PM I worked the mirror again with 12 minutes at 5 micron, followed by 12 minutes at 3 micron. This removed the small scratches, but once again I had a long radial scratch. 5 minutes of 5 micron and 5 minutes of 3 micron reduced the scratch but may have left a "pit" along that scratch; but another radial scratch was produced. By then it was 12:45AM, and Gordon suggested that these scratches were shallow enough that they'd polish out.
Polishing pads I
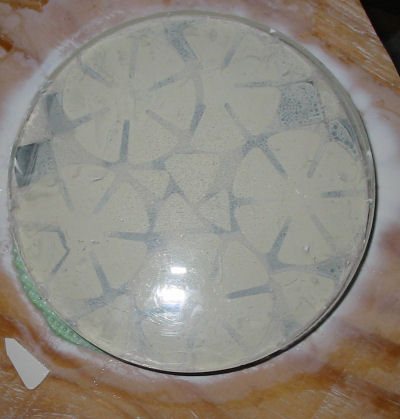
Dec 12 2005:At Gordon's ATM session I applied polishing pads to my tool. These pads are five-sided daisys. I put them down as follows: 1) apply pads, spaced at least 1/4 inch or so apart. 2) Burnish them down with a wooden dowell to make sure they adhere to their edges. 3) Use CerOx (standard stuff, not the "high purity" used in pitch polishing)and polish for "one hour per inch", says Michael, using the normal stroke. Gordon added "Six hours pads, two hours pitch."
In private discussion with Gordon later, he commented on the dilemma of using pads:
"I normally do a lot of polishing
with pads on the ceramic tool, just to get the glass clear. Pads leave
a poor surface with lots of zones, and tend toward a TDE. I always
clean up with a pitch lap after the pads. Takes maybe and hour or
two (on reasonably large glass) to smooth the damage from the
pads. ..[Pads] are only a convenience for rapid polishing. With the surface penalty
built in, it's much closer to a toss-up not whether to use pads at all."
I started at 8:45PM, inadvertantly using the "good stuff" CerOx for about half an hour, and worked for about two hours, MOT. Michael inspected the surface after cleaning and said "Wow!" as the surface quality appeared better than he expected. But only about 50% of the surface was smooth - the middle 1/3 zone - and there were still a few scratches. But the surface was good enough to try a Foucault test. Two scratches were prominant, and the edge and center appeared "high" but that's because the middle zone was polished out.
Discussion ensued. My choices were: Later that evening, after discussion with Gordon, I decided to go back to grinding. I had to accept his argument, that it was important for me to master this business of fine grinding NOW, rather than learn it later. Also, if I'm going to make several mirrors, fine grinding will save me many accumulative hours. Since it was likely that the next ATM session would be canceled for the holidays, Gordon gave me baggies of grinding compound. See this section for how I mixed them.
The next day, back at home, I removed the pads. I expected it would be difficult but they all but FELL off. They were not loose, but they peeled back with no grief, perhaps because they were not on more than a day. It was easy to get under them with a straight razor blade, lift a corner, and peel them back over themselves. Gordon recommended I do this promptly, and not the glue "age" or the pads harden. "You could pull off the tiles" if I let them remain, he noted.
Jan 08 2006: At home, on my completed grinding stand, I spent about an hour on polishing. I followed the 20 minute suggestions from Gordon: twenty minutes each at 12, 5 and 3 microns, clearing away each grit by
"soaking" the mirror with a water spay but NOT removing the mirror from the tool. I worked
TOT (tool on top) as I've previously mostly worked with the mirror on top. Working at home in a quiet house, I could hear the grinding going on. At the ATM shop, it's too noisy with discussions, too distracting with activity.
The twelve-micron session was about 19 minutes. I did three or four wets. I noticed the tool kinda "thunked" over the mirror at each end of the stroke. It felt like the mirror and tool were not of the same curve. I had to wet the mirror every three to seven minutes as it seemed to dry out and get sticky. Likewise at five microns over 25 minutes, I used several wets and still had that "thunk" behavior but at less intensity. It was not until 3 micron that the action between tool and mirror was smoother. After about eight minutes, it was much smoother. But at 11 minutes, I got that "thunk!" event that says the tool caught the mirror. I stopped and wet with compound, and carefully continued through 21 minutes at 12 micron.
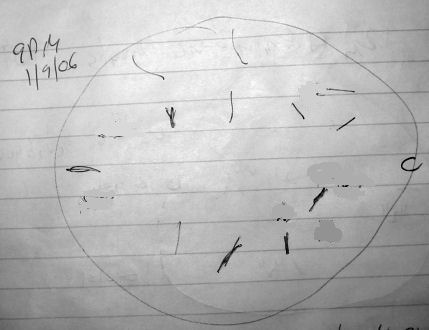
At 4PM, after the run I counted and sketched 11 scratches around the rim of the mirror. I used my diamond hone to round off the edges of all tiles along the edge of the tool. Then I toothbrushed the tool under running water before my next session.
6PM: I did another set of 12/5/3 micro sessions of 24, 23, and 22 minutes each, TOT. The fit between
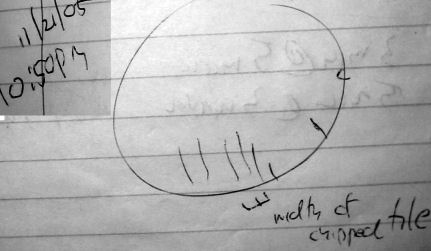
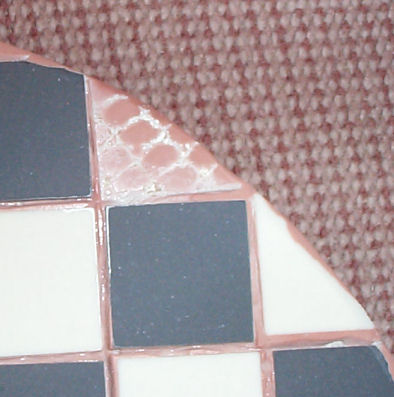
mirror and tool was better, I got smoother grinding sooner in the run. I still got "thunks" but I paid more attention to where they occurred. I seemed to get them when the tool was at a particular orientation relative to stroke. At the end I had about 18 scratches around the circumference of the tool, like this one, over an inch long, as illuminated with the maglight. Four of these scratches were from the previous run, most were radial but six were self-parallel.
I looked over the tool in the area where I believed it was seizing. It was the area where half a tile had fallen off some time ago. I noted that the edge of an adjacent tile was sharp (the horizontal edge in the photo), and likely that tile's inner corner as well. I had overlooked this tile when I hand-ground the edges after my previous run. The size of the scratches are about the width of a tile. I consider this the likely cause of my scratches and "thunk!"s.
The good news in this session is that I've not created any deep scratches, and none in the center of the mirror. I think I've discovered how the rim-scratches are occuring, and it's less about my techniques and more a matter of a tool with tiles too close to the edge. I want to move on to pads, and hope that they can polish off the worst of these remaining scratches.
Jan 09 2006:At the ATM session at Gordon Waite's shop, he reviewed my notes and my work of Jan 8th. He was perplexed as to how I kept getting scratches. As he said before, his own tools were worse than mine. "Do you mind if I work the mirror?", he asked. He wanted to see what results he'd have. I had no problem with this. At 8:40PM he used 5 micron for 5 minutes, TOT, at a pretty fast clip and with good pressure, maybe five pounds.
About 3-1/2 minutes in, he felt a tug on the tool. Gordon noted the face chip on my mirror, which occurred during rough grinding. "Face chips are evil. Did you bevel it in?" By this he asked if I took the rough edges off the chip. I said I probably had but it was long ago. He continued to grind and stopped after about 6-1/2 minutes and washed off the tool. Then he applied 3 micron for about 5 minutes. We then examined the mirror: it was covered with little scratches, a dozen of them. about 3/4" long. But Gordon's scratches were mostly in the middle zone; mine from earlier (now gone) were along the edges.
Gordon observed: "It grabs when the face chip is at 10 o'clock and 4 o'clock." That's relative to the worker, with "noon" at the position far in front when you are pushing, and 6 o'clock nearest to you. "But there's too little data to be sure about that." Gordon suggested I do another run, while noting the postion of tool and mirror and stroke whenever I got that "thunk!", the siezing of the tool or mirror, when a scratch occurs. I marked the tool at the place where half a tile fell off the edge: the mirror was already marked at the chip.
So I followed his session with another 12/5/3 run, again TOT, for 8/12/10 minutes respectively. But I checked after 12 micron for scratches: results were good, down to three old scratches, one new. But I did not get any "thunk!" until, j-u-s-t at the end of my 3 micron session, when I let the tool get too dry after about five minutes into the last wet. I got mine when the tool was at 3 o'clock, the mirror at 9 o'clock.
I took a break until 11PM before I tackled the deep scratch. I decided that 20 minutes of 12 micron would be a good effort, and then some very WET runs at 5 and 3 micron, to avoid the dryness which encourages seisures. Also I would work with less pressure, and slower. I also went MOT as the last sessions were TOT, so I could maintain my radius of curvature. None of my wets would be more than THREE MINUTES long; my last "thunk!" occured at five minutes of 3 micron. Indeed, after 20 minutes at 12, I cleaned and briefly examined the mirror. The big scratch was GONE! and I saw no others.
So I continued with 5 micron TOT for 10 minutes, again no wet longer than 3 minutes. I felt a little "tugging" but no "thunk!" action. Then I wet down the mirror without removing the tool with 3 micron, did a minute, wet again, did another minute, and then continued with 3-minute wets. All my applications were with the tool offset not by one-half, but one-third - again, to avoid leveraging the tool over the edge of the mirror. At 9 minutes I wet the mirror. No "thunk"s. At 9-1/2 minutes I decided not to press my luck: I wet the mirror again and carefully pulled it off the tool.
I cleaned the mirror and looked carefully: I could not see any scratches! I showed it to Gordon, who said there was too much cerox on the mirror. "Clean it some more - scrub it with the paper towels." (These are Bounty rolled white towels, Gordon insists these cause no scratches.) Gentle scrubbing under tap got more of the compound off. There were some v-e-r-y light tiny scratches, in several spots and in clusters. Also, some little "digs" in similar spotty patches. Careful inspection suggested seven very light scratches. "..all of which can be polished off. You're done - congratulations!" said Gordon. And that ended my fine grinding of this mirror - we'll put pads on next ATM session.
Gordon put the mirror to the tester to measure the curve. Six measurements of the center, and six of the "edge" (maybe 70% out from the center) gave a radial average of 89.461 center, 89.310 "edge", or an average of f/5.59 . While the radius difference is 1/6th inch, the difference in radius is very small - it amounts to a difference in depth of .00007, 70 millionths of an inch!
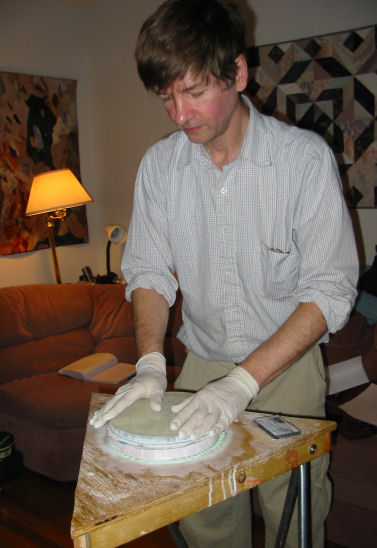
Jan 29 2006:I'm pad-polishing at home today because of the long delay to the next ATM session. My notes from my Dec 12th pad session will guide me today. I tried to put in four hours, but I could only manage three, it's a lot of standing and walking around the table. I worked from 2PM to 5PM as follows below. 2PM: put pads on tool. They did not stick well, the tool was probably not dry enough. I asked Gordon at the next ATM session about my lost polishing pads. He opined: "The tool was too wet when you applied them. The process is to dry the tool with a hair dryer, then apply the pads." He added, "Then cover the pads with a paper towel and use a stick to "burnish" the pads and push them in place, while still warm. Use a clean, NEW UNUSED toothbrush to brush the pads briskly, in order to brush up the fibers pushed down during burnishing. The threads hold the cerox, flattened fibers won't hold as much." He stressed the importance of water in the "wets", and that he mostly wets with water instead of more cerox. "Too much cerox in the pads makes them squishy," he said. To raise the fibers during polishing, he again advocated using a toothbrush between polishing sessions, "about 30 to 40 minutes".
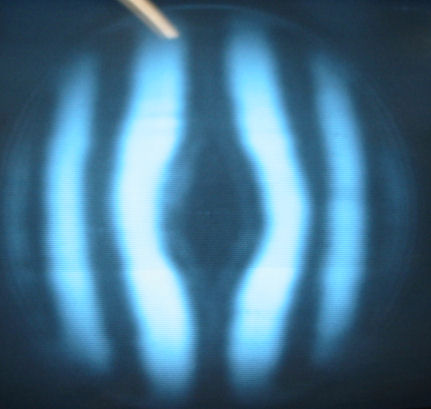
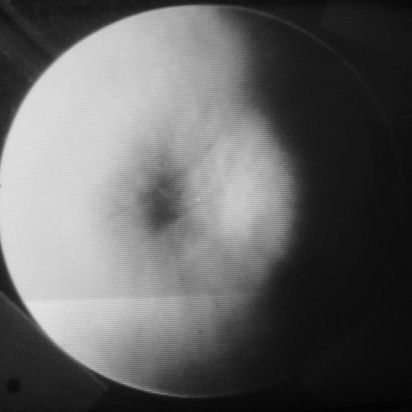
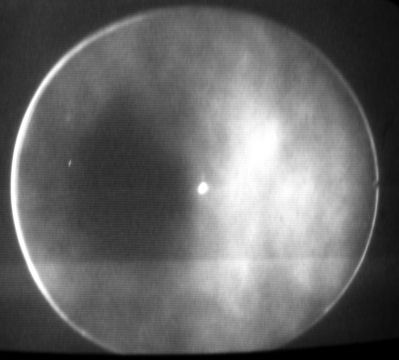
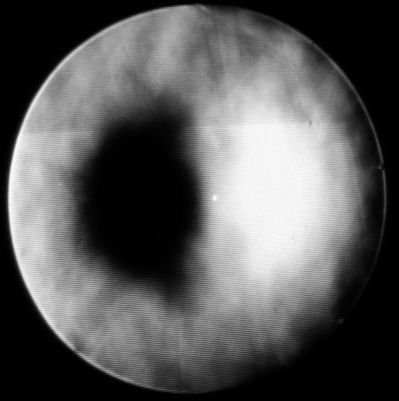
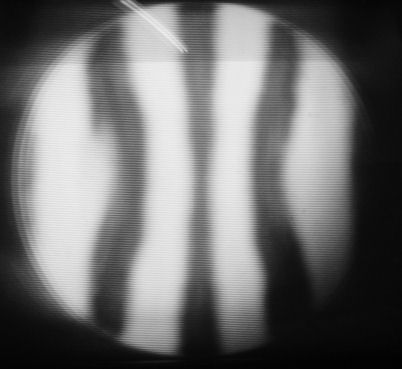
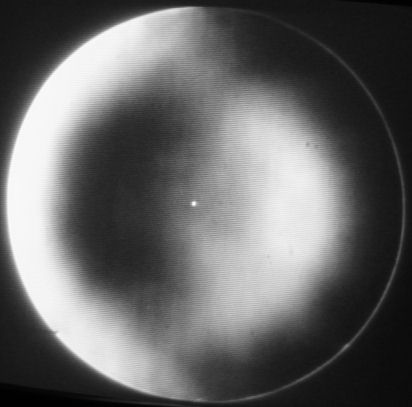
Jan 30 2006:7PM. At Gordon Waite's ATM session this evening, I looked at my mirror and could only find one small scratch, about one inch from the edge and maybe 1/3 inch long. Good enough. A sphereometer check gave these nubmers: (thanks to Emerson Waite for the arithmatic average) At 8:20PM We set up the mirror on the Foucault tester to get a clue about surface polish and curve. Gordon's inspection
of the Focaultgram
was that the appearance of a "turned down" edge was really a lack of polish in the outer zone. But there was a hill of sorts
in the center, as the Ronchigram shows. The center measurement was .470, the edge .225 for a delta of .245 inches in radius. (That's reasonably consistent with the sphereometer's delta.) Gordon suggested in pitch polishing to keep the mirror on top, use a longer stroke rather than a shorter stroke than my fine grinding stroke, and of course to keep the pitch "well pressed".
Jan 30 2006: 8:45PM We set up to create the pitch lap, and the rest of the evening of Jan 30th we created the lap. The details are long enough that I've created a a seperate Web page to describe its construction, and his particular methods to restore the lap instead of "microfaceting" .
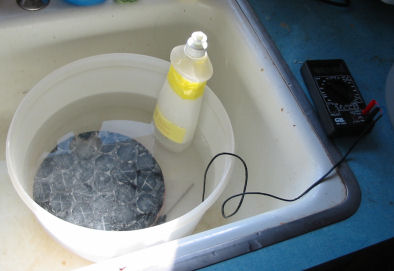
Gordon suggested my first press would be easy. Just cerox the tool and mirror, cold; put the tool atop the mirror, and let it sit OVERNIGHT ONLY, by its own weight. DON"T FORGET and leave it sit longer, he cautioned. I got home too late to try it that evening. So I left the tool and the mirror in their seperate containers.
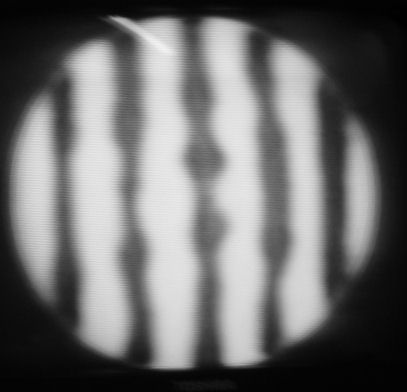
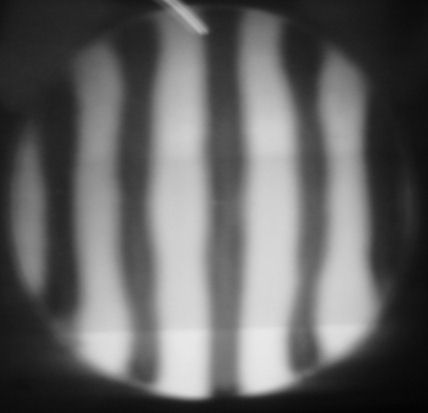
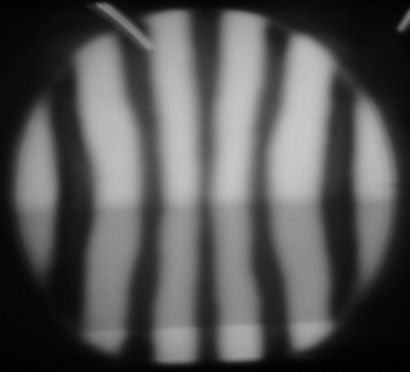
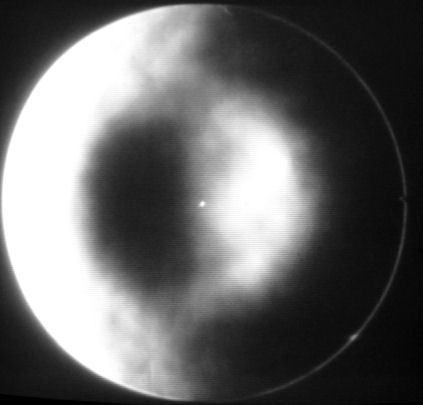
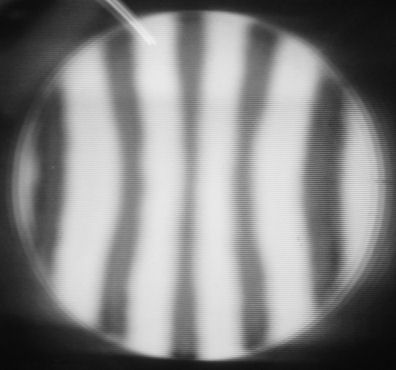
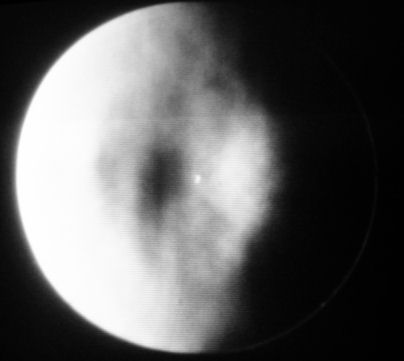
Feb 25: 10AM, washed mirror again. Feb 27-28:ATM session at Gordon Waite's. Here's some photos: Another 14 minute session of polish of under 1-inch strokes with the led to this Ronchigram
which is about 45 thous toward a sphere. The previous turned down edge is lessened. The surface is not too bad, as witness the corresponding Foucaultgram which shows a slight hole as well.
The numbers for the last session are below, resulting in a 1/.6 paraboloid or 1/1.7 sphere: mar 13-14:Figuring: ATM session at Gordon Waite's.
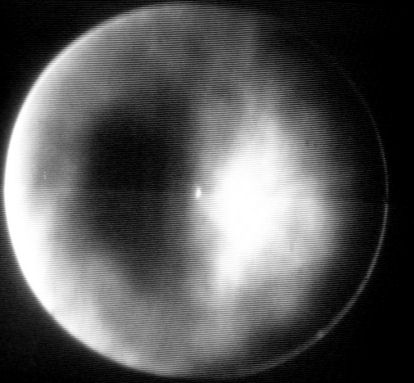
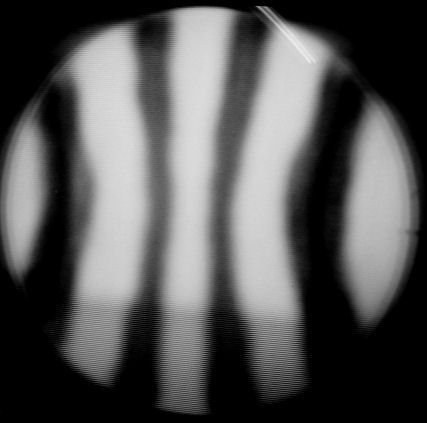
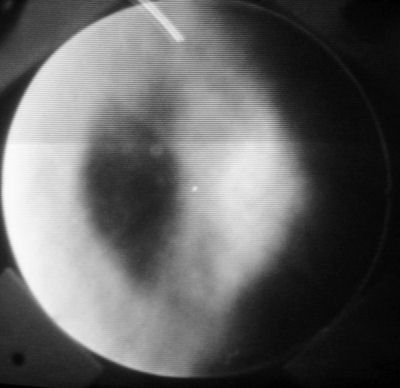
At 8PM I prepare and warm press the tool, followed the prescription from the previous session. By 9:30PM I'm testing the results, as this 9PM Foucaultgram and this Ronchigram show. Gordon says the edge is better - "a good diffraction ring" but the zoning has worsened from the short strokes (as it will).
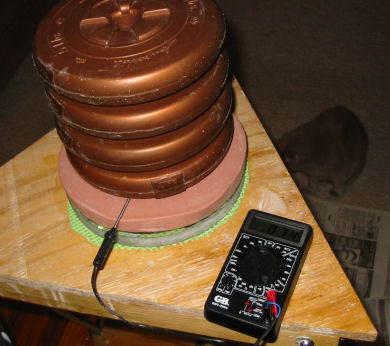
The press is also not so good, as apprently the tool is not conforming well to the mirror. When I warm press to start, I'm putting my full weight on the warmed tool for 30 seconds or so, then about 40 lbs of weights for about 20 minutes. Gordon says this is not a good strategy. Just brass wirebrush the warmed tool and then press with 10-20 lbs weight, and don't jump on it. (This is a change from Gordon's methods last year.)
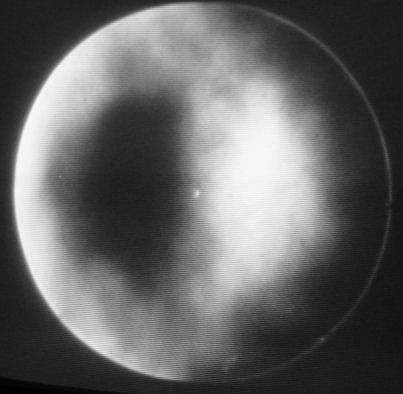
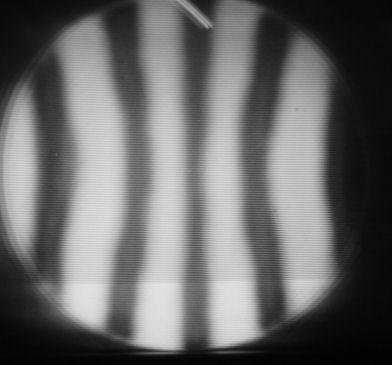
The new prescription is about 40 minutes of 1/3rd stroke COC with 1 inch of W, in four 10 minute sessions, with 10 minute warm brush and press. In actual sessions, I did 11.5 minutes, then 5 minutes on my table and 6 on Gordon's more steady portable table; then 13 minutes on Gordon's table. By midnite here are the Foucaultgram and the Ronchigram results. Gordon says it's a little oblate (the center is high) but the edge is "perfect" for a parabola. The numbers are below, including the desired parabola, and measure a 1/.6 paraboloid or 1/1.6 sphere:
The prescription is a little complex. Since I'm within range of a parabola, the strategy is to perform a parabolization or figuring stroke but only on the middle zones, and try to leave the innermost zone (and the edge) relatively unchanged. If the center could go down (relatively) to 166 from 243 the mirror would be approximately parabolized. Therefore, do a W stroke with MOT, from fairly off-center, to about one inch from center. Practically, the offset limit is 3/4 inch short of 4 inches or 3-1/4 inch out; to end at no less than one inch out, for ten minutes or so.
The figuring stroke is very different from the center-over-center stroke for carving and smoothing the sphere. This particular W-stroke starts at the maximum offset and ends at the minimum offset to the right. A parabolizing stroke from a sphere would go from maximum offset to the right to maximum offset to the left through the center. There are other issues and differences from the COC spherizing stroke which I'll discuss seperately (later).
This prescription was: From 3-1/4 offset right go UP for ONE, over and down then UP for TWO, and over and down and UP for
THREE with the mirror at the 1-inch overhang. Then to return: back and down then UP for TWO, then back and down and UP for ONE at the 3-1/4 offset. The last stroke leaves the mirror at the "high" end of the first stroke. Without moving the mirror, walk to the right (a virtual rotation of the mirror) and then push the mirror UP again to start the new W stroke.
I struggle to make this stroke, but I generally move the mirror too close to the center, and I'm sloppy. Gordon did about 3 minutes worth to show me, and obliges me to do about 12 minutes "to do actual work". By 1:30AM here is the resulting Foucaultgram and the Ronchigram. The 70% zone needs work, and now there is a substantial (?) hole where the hill was (from working close to the center), but the outermost zone survived. (There are some apparent sleeks on the mirror, but they may be due to leftover cerox and cleaning before testing. Also there is some dogbisketing or surface roughness. Some or all of this may go away in subsequent figuring.)
The numbers are below, for a 1/1.5 parabola: I got Gordon's prescription to correct this, but by then it was 2AM and we (Gordon, Michael and myself) were all getting tired. There was some debate between Gordon and Michael, to either use correcting stokes to FIX the parabola (Gordon) or to go "further" to the sphere and then come BACK to the parabola (Michael). A few days later Gordon reviewed this data and gave his prescription as below.
"Actually, to either fix it or take it back toward a sphere, you
need to stroke MOT with the mirror overhanging about 1.25". The
stroke should be about two or three inches long... whatever fits in
keeping the center of the mirror within 3/4" of the edge of the lap.
The stroke is tangential to the radius."
"Also, your "hole" isn't all that substantial. Whenever you underwork
the 50% zone--as on this mirror--the center looks like a deep hole. But
that's only because the 50% zone isn't properly parabolized. When you
put in the work on the 50% zone, the center hole will magically start to disappear." - Gordon Waite
Gordon makes a point indirectly: you don't fill a hole, you polish down the surrounding hills. Working the 50% zone
works down the hills, and hopefully leaves the outer zones relatively intact.
Mar 27-28:At 10:47PM I did a "lukewarm" press for 23 minutes with 20 lbs weight or so. Again the prescription was MOT, mirror overhand 1.25", a 2 to 3-inch stroke, keeping the center within 3/4" of the tool edge. My session was 6 minutes, a wet, and 4 minutes.By midnite here is the resulting Foucaultgram and the Ronchigram. The resulting numbers are below, for a 1/3.7 parabola: The prescription was initially for MOT, 2 inches offset, a 2-inch stroke for 5 minutes. But Gordon reconsidered this and said to do a series of four strokes: three at 2" out, then one at 2-3/4" out, for five minutes to correct the zone (in error as it turned out, he meant to spend more time at 2-3/4"). "And go around the table three times in that five minutes." I did a 20 lb press for a few minutes, then Gordon said do a heavier but shorter press and added 25 lbs for another 4 minutes. (I forgot to wire-brush the tool this time.)
By 12:30 I went around the table about four times in 10 minutes of stop and go work, as Gordon watched and made numerous suggestions about my technique. For instance, he showed me how to both walk around the table in small steps AND move the mirror. It's important, he noted, not to stand in wide and fixed places around the table - that leads to patterns and that irregular, "dog bisquit" surface. He also asked me late in the session to abandon the extra stroke at 2-3/4 inches.
By 1AM here is the resulting Foucaultgram and the Ronchigram.
The resulting numbers are below, for a 1/1.9 parabola and 89-1/8" radius, the consequence of a wrong prescription: But before I left, I asked Gordon and Michael for some "homework" reading. They conferred and chose "Howard" - meaning
the "Standard Handbook for Telescope Making" by Neale E. Howard. Here's a link to it on Stellafane's ATM Web page. Chapters 7 thru 9 cover figuring and surface issues and that was my assignment.
April 10th 2006- This session was an exercise in the consequence of not doing all the prep work for a figuring session; plus the problems of using .1 micron "mouse milk" Cerox; plus learning various correcting strokes to "fix" a broken parabola (see notes).
8:30PM Scrubbed tool, pressed 20 lbs warm for 17 minutes while getting a "prescription". Gordon suggested working the 70% zone with a 1.4-inch stroke either side of center "but not too exact" for four 5-minute sessions. MOT, straight strokes. I suggested I use the fine cerox, to learn about its use. First session with it was with very light pressure as it was sticky sometimes, other times really smooth (floating). Did 7.5 minutes. Pressed for 6 minutes, then added Cerox. Second session 5 minutes, felt mostly better, pressed for 5 minutes. Third session 5.5 minutes, went around table two or three times completely.
9:42PM cleaned mirror, cooled down, tested. Gordon looks at Foucaultgram and Ronchigram; mirror is zoney from short stroke, sees a lap pattern. Parabolization is lost but it is working down.
Result is 1/3.3 mirror at zone 2 here is a Foucaultgram,
here is a Ronchigram
Prescription is to work 2 MINUTES of a 1.5 inch stroke, otherwise as previous. Follow this with a 1-2-1-2-1 stroke either side of center by 1.5 inches, for 4 minutes, "5 tops, ...as smooth as you possibly can".
10:18PM pressed 5 minutes (didn't scrub tool, did'nt cool down), then did the 1.5 inch stroke for 2.25 minutes. Pressed for 5 minutes, did the 12121 stroke for 4.5 minutes around the table twice.
10:50PM clean and cooldown, then test mirror: 1/2.4 @ zone 2
here is a Ronchigram
Center is getting deeper - very strange says Gordon. Says do 7-1/2 minute short stroke of 1.5 inches to reduce center. Did just that, after press (no scrub, no cooldown) in four walkarounds of the table.
11:35PM: clean and cooldown mirror. Foucaultgram shows scratches and a lot of dog bisquit. Test gives 1/2.2
here is a Foucaultgram,
here is a Ronchigram
Why is this - Gordon is perplexed. The numbers show little work and a deepening center which is not reasonable for my stokes. He quizzed me about my methods and I saw that I'd forgotten to wire-scrub the tool after testing in the last two rounds. So, try the same short stroke AGAIN.
12PM Scrub with wire brush under warm water, press 6 minutes. Did 6 minutes of short stroke, went 4 times around table. Added cerox at 4 minutes.
12:30AM clean and cooldown, Foucault shows "mottled look". tests show 1/2.7
here is a Foucaultgram,
here is a Ronchigram
This is better but not much work.
12:45AM, April 11th:After looking at my work above, Gordon Waite says: "These results are just too strange. Look, you're going to take this back to a sphere anyway. Why not let me get a session on the mirror, see what going on. You can watch, take notes, whatever. Then next time you can spherize the mirror and then work on your parabolization stroke." Seemed reasonable. IN retrospect, it also gave me a chance to review how to prepare the tool and mirror for figuring, since I frankly goofed that up this evening.
Gordon's figuring
Gordon prepared the pitch tool and then moved it to a rotating table. Then Gordon did several minutes of various 1 to 2 minute sets of a particular stroke, mirror on top, asking me to call out the time for each set. Sometimes he did a few minutes of the center-over-center stroke; sometimes a minute, or 1.5 minutes, of an offset stroke. Some of his center work was with a LOT of pressure: the mirror was noticably warmer to the touch afterward. He finished up by spraying down the tool in place with water from a squirt bottle, and then a few minutes' work using the .1 micron fine Cerox.
Results: testing after it cooled in room-temperature water for about 5 minutes and then again at several-minute intervals. (Note: used my digital meter thermometer: water 64 degrees, air 68, Gordon's wall thermometer says 64 degrees.) While the center is relatively flat as shown by the shadowgrams, and it still has some surface irregularities, "it's better than most commercial 1/4-wave mirrors". Given the margin of measurement error, the mirror has a 90% probability of 1/6th wave.
Since we had all these measures, I asked Gordon whether this glass was "like" Pyrex in how it shifted with temperature. He said it was "consistent" with Pyrex. Plate glass would take much longer to cool down, and these measures would change much more from minute to minute, and moreso over several minutes.
As I agreed, I took the parabolized mirror and refigured it to a sphere and then a parabola. To see how I did that,
check my "zones" document. That document also describes techniques in figuring and in reading
Ronchi and Foucault patterns or "-grams".
In 2004, I acquired four rather large sheets of glass from a physics lab. I don't think
I'll get info from the sellers. Here's what I know: the size is
.809" thick (20.5mm) and 33-3/8 inches square - that's 901.14 cubic
inches of glass, less some bevels. The weight, using a veterinary's
digital scale, is 85.2 lbs =/- .1, notwithstanding its calibrations.
This suggests a density of .0945 lbs/in3 or 2.617 g/cm3.
The color of the glass is a little yellow - definitely not green. I used
a stereo microscope to measure the visual depth (focus from front to
back), and visual thickness is about 33/64's (.5156+) using a machinist metal
ruler. The ratio of these values is 1.569 which in principle should be
the refractive index. The information I got on this procedure suggested there is a
1.5% error in the visual depth measure due to the slight visual angle
(but not which way!) With a 1.5% variation, that suggests a refractive
index of 1.545 to 1.592.
The fun part is determining what glass corresponds to these parameters.
Glasses that seem to correspond to a density of about 2.62 and n =
1.54-1.59 include Schott B270, (2.55, 1.52) which is offered in large
sheets; its expansion coefficient is about 95 X 10-7, similar to many
borosilicate glasses and about 3 times that of Pyrex. Pyrex is a little
lighter (2.23 g/cm3) and has a different refractive index (1.474) and I
believe outside my likely error range. Oddly enough a Zemat ACL 2090
glass is close (2.530, 1.54) and has a .5 X 10-7 expansion coefficient.
In April 2005 I pulled out one sheet for cutting up. I cleaned
it, and verified it is 33-3/8 inches on a side, with a small bevel. On
the piece pulled, it has an edge chip perhaps an inch roughly in radius
and maybe 20% deep. The fracture seems typical of window glass, as opposed
to "safety" glass.
It was suggested I use a polarizer filter, and a polarized light source, to
look through the glass to look for stress and striations. Other than indirect
sunlight from a clear blue sky, a common source of polarized light is the blank white
screen of a laptop. As for polarizing filters, I bought two 50mm polarizers for a film camera;
the combination when rotated in opposition produces a very dark filter. As a test for
stress, I was told to look through a car windshield - the shatterproof "tempered" glass is very
pre-stressed, so it will break into little pieces and not sharp shards.
Observing via polarizer through my car's windshield to the laptop white screen on my carseat, I see it's
VERY polarized, it's surprising. I did not see any variation in "darkness" through the portion of
the glass I looked through to the laptop. But I only saw a little bit of
banding through my car windshield or side window. I worked outside so my
car's glass was convenient. A pair of cheap reading glasses showed
STRONG strain at the "corners" but that's an extreme case.
I repeated the test through one sheet of my glass. With effort I (and Gordon Waite) saw
some gradual bands in the glass. He suggested it was simply stress due to flexure in the large
vertical sheet.
In June 2005 I contracted to have the glass cut into circular blanks. The question was: what
diameter of blanks? The issues are economics (bigger is more valuable), thickness (thin
mirrors are hard to work, and distort from their own weight), and material (is it Pyrex? or not?).
I concluded that a diameter to thickness ratio of 10 to 1 or better would be prudent. Also there was
an issue about providing enough space between disks to cut properly. Consequently
one sheet was cut into twelve 8-inch blanks and four 6-inch blanks.
In July 2005 I selected one 8" blank after testing a number of them using the laptop/polarizer test for stress. Most of the blanks had very little
stress, but a few had point source stresses. All of them had stress along the unbeveled edges; this
is known as the Tyman (sic?) effect where sharp corners are stressed, and can be resolved by beveling.
I chose one blank to make a mirror: the rest of this note describes that process.
In 2005-2006 I made a 8-inch f/5.5 mirror from one blank of this glass. (Of course that's the subject of this
Web page.) In March 2006 I had the blank down near a sphere, enough that the Foucault test could be used on it.
Here's some measurements and comments on one such test set which suggests the glass is Pyrex,
or Pyrex-like.
A colleague looked up some real prices in the Newport Glass
catalog for circular blanks in early 2005, as below. One of my sheets
could produce up to 16 blanks of 8-inch size: remember the sheet is .8 inches thick.
I will list the ATM books I've read here. They include the old and commonly quoted books, listed on
many ATM sites.
Gordon and I talked about the overuse of grits by ATM'ers, or the over-supply of grits in mirror kits. I came across Edmund Scientifics's how-to mirror making booklet from the mid 1960's. Here is their take on abrasives for grinding a 6-inch f/8:
Note: the grits are Aluminum Oxide, except the #305 emery which is about 1000-grade grit. Gordon saw these figures and said "Cool... first accurate numbers I've seen, I think!"
Googltz pitch #64, with a bit of beeswax How many runs of 12/5/3 micron did this mirror go through? Nine sessions, including one by Gordon. The first was done Nov 7th, the last Jan 9th. I counted 440 minutes total, about 7-1/2 hours work. (It seemed a lot longer.) A run of grit was for as long as 20 minutes, and as short as 5 minutes. Oh, and one two-hour session with polishing pads, which did not remove scratches so I went back to fine grinding. I don't know that I got good at fine grinding, but I became more careful, and I learned something.
Practices: (premliminary 1/10/06) Gordon is perplexed as to why I've had such troubles with scratches. But my best results were when I kept to the following practices. One, I kept my "wets" short, best at about 3 minutes, I got scratches at 5 minutes. Two, I did not remove the mirror between grits, just wet down the pair with the finer grit at two 1-minute intervals. Three, I moved the mirror aside only 1/3 to apply grits, while applying light pressure on the side still in contact. Four, my grinding pressure was modest, maybe five pounds (tool and mirror weigh 3 lbs). Five, I avoided removing the mirror to test - removing the mirror from the tool is the best opportunity for scratches from mishandling. How long to run a grit? It depends on specifics. 12 micron to remove scratches from previous 12, 5 or 3 micron events took 10, 20, up to 40 minutes; to just resurface can be done in several minutes. Runs of 5 and 3 microns can be several minutes, more if you have finer scratches. Again, I had less scratches when my "wets" were three minutes or less. All this was for my mirror, and my tool.
As of Jan 10th, I'm still of the opinion that success at fine grinding is about technique, observing your results, and about making a regular tool (or fixing a bad one). I think my edge tiles kept giving me scratches, even though Gordon's tools have worse edges. My next tool will ABSOLUTELY have a 1/4 inch rim of plaster or better - this one did not, and it accounts in part for losing edge tiles.
Gordon says it's important to mix find grinding compounds with water, and apply the mix - not to apply power and then water. The ratio of water to compound is not critical, he says, just so it looks "milky": too thin and it just grinds less efficiently. He recommended about a teaspoon or tablespoon in 6 to 8 ounces of water, in a squeeze bottle. I used mustard bottles.
(Just a summary pending more edits). Mark up a mirror with a grid or with radial lines using a marker (brand name is Sharpie). Use very small center over center strokes, dry, between mirror and tool. Look for where the Sharpie marks wear away to determine areas of contact. Some say this test MUST be done dry; others use cerium oxide and water. I have not investigated the history of this test, don't quote me.
If you read my document on scratches, it mentions the arguments of others that you should NOT do fine grinding, because it tends to scratches; whereas you can just polish more to reduce the surface and remove scratches, under safer conditions.
I asked Gordon about this tradeoff. "What's the ratio of polishing time to fine grinding time to remove scratches?" He looked puzzled, so I said "How much longer does it take to remove by polishing, that which you can remove by fine grinding?" Gordon thought about it and said, "It's about 30 to 1."
He continued, "But look at it this way. How much time do you expect to take to polish out the surface?" I didn't really know, this was my first mirror I took from, er, scratch through figuring. He said for me, "It might take you about eight hours. Now, how much long for figuring?" "At least that long, if not longer," I said. "Well," he responded, "that's more than enough time to remove any scratches, that you could otherwise remove with fine grinding." I also recalled what he said earlier about using 3 and 5 micron: the point of using it is to save polishing time.
But as I considered it before my fine grinding was done, my time was LOST not gained! In fine grinding to remove one set of scratches, I created more at the end of the set! Gordon and I theorize, these scratches were due to some combination of edge tiles on the tool and technique problems in removing the mirror from the tool. (See my scratch document for the details.) But at the end of my fine grinding, he was perplexed as to where the scratchs came from.
Looking back at my scratch removals, I found that a fingernail-detectable scratch could be polished out in about 20 minutes of 12 micron; followed of course by several minutes of 5 and 3 micron to refine the surface. Scratches that a fingernail cannot detect can be removed in less time. This is notwithstanding my problems in creating NEW scratches while removing old ones!
So I'm certain that 12 micron grinding on a hard tool is generally worthwhile. But I'm less certain about 5 micron and 3 micron, at least for wets of more than a few minutes at a time.
Of course, at any stage of work, NEVER move the center of the mirror past the edge of the tool. That simply tilts the mirror onto the edge of the tool, a dangerous situation. Always put some pressure on the mirror ABOVE the tool, so there is no pressure on that part of the mirror which overhangs the tool below.
Many scratches at fine grinding time seem to be caused by contact between a sharp tile and the mirror, often at the edge of the tool, often when removing the mirror. You can get a lot of suction force on the mirror at the end of the wet. Similar problems occur when you are moving the mirror aside to add water or grit. The general way to avoid scratches is to use good practices to avoid contact between a tile edge, particularly at the edge of the tool, and the mirror.
One good practice is not to set tiles too near the edge of the tool. Gordon had recommended a 1/4" gap around my eight-inch tool which should be only dental plaster. But I trimmed the tile sheet too big, and a number of tiles were on the edge. Ultimately they wore thin - the tool is ground down most along the edge - and either broke off or stayed but with a sharp edge. And in fact, if you read my discussions above it's clear some of my scratches directly correspond to edge tile "issues".
Another set of practices are related to seperating the mirror from the tool: avoid this when you can, proceed carefully when you must. The details are complex enough that I discuss them seperately.
Other practices are to keep the grit WET - dry grit means less water between tool and mirror. This creates a tigher seal between, and a vacuum can form. In effect you get atmostpheric pressure between tool and mirror, several pounds per SQUARE INCH force. This is sufficient to scrape the mirror on the slightest edge or rise or contaminant. I found that shorter "wets" reduced this risk, at a cost of extra time in grinding as a drier grit grinds faster. But any time gained will be lost if you have scratches which require going back a few grits.
These practices are cautions about removing the mirror from the tool. One caution is simple - avoid removing the mirror! Most ATM'ers advise you to NOT inspect by removing the mirror. Phrases like "more work, less testing" and so on, are ways to remind you that removing the mirror is risky.
How about when changing grits? Gordon advised me on this, at the end of my 5 micron work. "To go to 3 micron from five, here's what you do. Pull the mirror ALMOST halfway off, and flood the tool underneath with water. Then move the mirror to the opposite side and do the same. Then pull it off slightly to the side and apply 5 micron from the squirt bottle. Work it back and forth for two minutes. Repeat the water wash and apply more 3 micron. Now you are on pure 3 micron."
Ultimately, you have to seperate the mirror and tool. Here's some techniques Gordon showed me. First, you wet the tool and mirror as described above. Next, you choose the tool edge with the widest ring of dental plaster to slide the mirror over, so avoiding those tile edges. In general, as you move the mirror off keep downward pressure on the far edge of the mirror which will remain on top of the tool; but provide some "lift" on the part of the mirror outside the tool. Then wait until the suction goes away before lifting the mirror off.
A picture would be clearer, but if you imagine your hands along either side of the mirror; there is the near edge which is OFF the tool in front of you; and you can put your thumbs on the far edge of the mirror which is still ON the tool and away from you. Fingertips on the mirror sides pull up SLIGHTLY, the thumbs press down above the center of the tool. All this is to relieve the pressure on that edge of the tool under the mirror; and to keep the mirror from tipping over the edge.
As you pull the center of the mirror past the edge, you should be able to curl your fingers down so that the nuckles are supported by the grinding table. But your fingers are still holding the mirror by the edge, they are not touching the mirror surface. You can use the leverage of the table to GENTLY and SLOWLY put lifting force on the mirror without tipping the FAR edge onto the tool.
Then you STOP moving the mirror, and WAIT for the water to seep under the remaining part of the mirror to "break the suction". You can see the air pockets form under the mirror and above the tool. Use the surface of the table to steady your fingers and control your lifting force. In time the air will completely fill the space between tiles and mirror. THEN you can SLOWLY lift the mirror up and away. Dont' "ding" the mirror edge on the tool as you do so.
Construction of the pitch tool on my former tiled grinding tool is on a seperate Web page.
The working temperature for my polishing will be 65 to 70 degrees F, based on the pitch and beeswax mix Gordon uses. He uses Gogoltz 64 pitch: I did not ask how much beeswax he added. When he inspected the tile tool before making the lap, he noticed the missing tile along the edge, and a portion of another missing tile further along the edge. "That's gonna be a problem," he said, "because it may create an air pocket and bubble if the pitch gets too hot during a press." We completed the pitch lap without incident.
Gordon suggested my first press for the new tool would be easy. Just cerox the tool and mirror, cold; put the tool atop the mirror, and let it sit OVERNIGHT ONLY, by its own weight. DON"T FORGET and leave it sit longer, he cautioned.
Construction of the pitch tool on my former tiled grinding tool is on a seperate Web page. Here is how Gordon prepared mirror and tool for figuring work, in April 2006. This is the method I used for this mirror. On figuring a previous mirror, I used a screen to microfacet.
a) Clean the tool under cold tap water, using a small clean BRASS brush to scrub it. Scrub in a somewhat random fashion, no patterns! On a previously used tool, you'll see the grey glossy layer of glaze, still charged with white CerOx, change to a dark surface with fine lines from the brush. At an earlier time, Gordon instructed me to ALSO use a single-edge razor blade and to put an X across each facet of the tool, and then wirebrush. "The point", he explained, "is to remove the chips and to rough up the tool. Make the crosses somewhat random: don't follow a pattern....Scratching and roughing up the facets is quicker and just as effective" as microfaceting by screen.
b) Then run warm water to heat up the pitch for under a minute, rotating the tool so no part is under the tap very long. Put in pan of warm water. Give time for pitch to get soft to your fingernail, checking along the edge between the facets. Don't touch the facets!
c) Coat with 1 micron Cerox (not the fine stuff). Press for 5 minutes with 20 lbs weight (on an 8-inch mirror). Then remove weight and let cool 6 minutes.
d) Before starting the session, break the lap free by hand as it should stick to the mirror. Force it off slowly about an inch to one side and move around without pressure until it stops sticking.
I got into trouble in my figuring sessions, because I've neglected doing some of these steps between tests. I also had trouble because of the .1 micron Cerox I used.
For reference, here is how Gordon prepared mirror and tool for figuring work with screen microfaceting, which I used on another mirror. (I used brass brush microfaceting on the mirror on this page.)
At the start of a polishing session with the pitch tool, Gordon instructed, put the mirror and the tool and CerOx bottle in warm water in a shallow pan. "No hotter than 110 degrees," he cautioned, "and only for a few minutes." With the tool still in water, poke the pitch (not on the facets!) at intervals with a fingernail; when the pitch BEGINS to get soft it is ready. (In later work, Gordon would recommend you run too and mirror under warm tap water as describe above in brass-brush microfaceting.)
Then remove the mirror from the pan, cover it with a clean piece of nylon screening, and squirt some CerOx on it. Next, pull the tool out and CerOx it, and press it promptly on the mirror with weights on top.
"Press with care: too long or too hot and you'll squish the pitch. Too short or too cold, and the tool won't conform to the mirror surface - that's evil." After pressing leave the tool on the mirror in place until both have cooled, then begin polishing. In my work on 8-inch mirrors, I've pressed with 10, 15, 20 pounds "warm" for five minutes, then let cool for
five to several minutes.
During my April 24th spherizing sessions, I asked Gordon about the stroke strategy. He made numerous suggestions. "Look at the ends of the Ronchi bars", he said. "Where they bend from the straight is where the zone begins [from the edge]. That suggests the length of the short stroke needed to fix it. But you have to be careful: the bad thing they do is that they leave ring zones on the mirror if you use short strokes for too long, or with too much pressure."
"So use SOME short strokes, with a lot of pressure, but do that stroke alternately with the other kinds of strokes you need." He described doing for instance a minute of long strokes, a minute of short; a minute of long strokes, a minute of W-strokes; and so on as alternate sets. "For instance, you need long strokes to plane down the center. All these different strokes don't hurt each other, they help but in different ways." Doing them as sets rather than randomly, said Gordon, is a way of controlling and monitoring your results.
He also commented on how light pressure creates surface roughness, as the pitch just skips over the surface and so polishes it intermittantly. My surface was improved recently due to my use of more pressure, at Gordon's suggestion. When my arms were hurting from the additional work, he said "that's a good sign".
Another way to interpret the mask data, said Gordon, was to look at zone-to-zone changes over each run. For instance, the third and fifth zone differences had gone from +44 to +54 to +51; I was not damaging the figure of the outer 50% area. Also, the overall delta from center to edge zones was shrinking from 55 to 43 to 19; of course at a sphere it will be zero.
In the figuring process, it's time to pay attention to surface roughness. In the following Foucaultgrams, ignore the X-like diagonal features radiating out from the center: that's from the surface behind the mirror. Here is a surface Foucaultgram from Mar 27th as I start to get near the desired figure. Note the edge of the shadow on the right: it's lumpy not a smooth edge. That indicates large-scale surface irregularities, often called "dog bisquit-y". By 1AM later that evening, here is the resulting surface Foucaultgram, with a similar shadow line. What is not visible on these images are apparent linear patterns, consequences of a limited number of strokes or a narrow range of variation of stroke. For instance, in this earlier Foucaultgram you can see zoning from a session of too-rigidly-identical stokes of pitch polishing.
Lines and surface variations are reduced by a combination of slower strokes, slower "walking" around the table as I stroke, and careful variation of stroke and mirror. SOme of that is discussed in my March 27th session notes above.
A finer surface irregularity is called "microripple". I'll discuss that as I work on it.
Gordon calls the .1 micron Cerox (Salem Distributing, CD-ROTE CR454-S) "mouse milk" mostly because when it is at the right "strength" it is just "a pale, thin milky color". At .1 micron it has a very small particle size; and it has a tight particle distribution. The "regular" Cerox Gordon uses for general figuring and polishing is 1-micron high-purity Cerox (Salem, C370-K). Many ATM'ers use a Cerox also called "1 micron" but it is about 40-60% cerium oxide, and also has a wider particle distribution, so Gordon does not use it in his shop.
The trouble with the .1 micron "mouse milk", says Gordon, is that "it is grabby because the smaller particle size provides no space [between the glass and pitch facets]. It just wedges into the pitch and the tool gets really grabby." Any interruption in smooth motion leads to dog-biscuit (lumpy surface variations) and other surface problems. In private discussion he went on to say: "It has properties unlike regular cerox, so you have to experiment with it to find out what it does differently. Most of the problems have to do with machine work. The machine is harsher and more unforgiving than hand work. If something is wrong between the lap and the mirror, the machine can't feel it the way you can with your hands. So the machine keeps plugging away, damaging your surface if conditions aren't right."
And in fact, for most of my sessions with this Cerox, the mirror either floated atop the liquid (no contact, no work), or dragged occasionally on the pitch (intermittant glass removal = irregular surface). So why use it at all? Gordon said on another occasion "I use the C370K for all rough polishing, and switch to [the fine Cerox] for the last five or six working sessions." Likewise, Michael noted that he only uses the .1 micron "when I'm closer than 1/4 wave" to the desired parabola.
"Like most other stuff," concludes Gordon, "it has a place in advanced mirror making. And like most other stuff, it has a learning curve you have to overcome."
To be written...
Herb Johnson
Copyright © 2023 Herb Johnson
1) Do I continue pad polishing for two hours, go to pitch, and ignore the few scratches?
2) Do I go back to 12/5/3 micron grinding to get rid of scratches, AND try not to make more?
3) Or go back to 12 micro to get rid of the scratches, but then go to pads to avoid making more scratches?
Scratch remediation II
Scratch remediation III
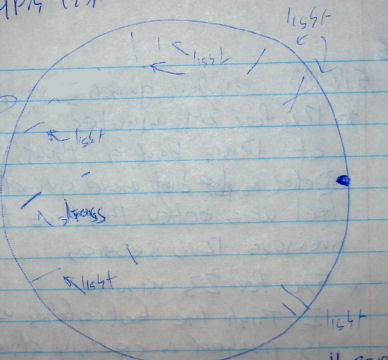
![[mirror Jan 9 2006 10PM]](06jan09_10.jpg) Sure enough, upon examining the mirror at 10PM, I had a "fingernail" scratch (i.e. one your fingernail will stumble over), in the direction of stroke for the mirror at 3 o'clock, and along the edge at about 4:30 o'clock. There were two other edge scratches, light and all parallel, nearby; and a fourth small scratch also parallel at the 7 o'clock edge. Behaviors consistent with my earlier grinding; and different again from Gordon's results. Gordon and I examined the geometry of tool and mirror, but he could not draw any conclusions. I thought it was related to the missing half-tile. Michael was there: his advice was "Two words...twelve micron.". He does not support the use of finer grits with tile tools because of these kind of scratch problems.
Sure enough, upon examining the mirror at 10PM, I had a "fingernail" scratch (i.e. one your fingernail will stumble over), in the direction of stroke for the mirror at 3 o'clock, and along the edge at about 4:30 o'clock. There were two other edge scratches, light and all parallel, nearby; and a fourth small scratch also parallel at the 7 o'clock edge. Behaviors consistent with my earlier grinding; and different again from Gordon's results. Gordon and I examined the geometry of tool and mirror, but he could not draw any conclusions. I thought it was related to the missing half-tile. Michael was there: his advice was "Two words...twelve micron.". He does not support the use of finer grits with tile tools because of these kind of scratch problems.
a more careful session
![[pad tool]](29janpad1.jpg)
Polishing pads II
2:15PM: Mirror on top, wets every 3-4 minutes.
I can see the pads through the mirror.
3:07PM: Tool on top.
3:42PM: Put mirror on top, the mirror was too slippery on its pad by now.
4:03PM: one "petal" came off while adding CerOx, an isolated petal.
4:57PM: another petal came off as above.
5:15PM: quit. As I removed the mirror it pulled a whole "daisy" off. So I pulled off all of them, half came off easily.
center 89.327 89.127 89.227 89.327 avr 89.214
edge 89.227 89.027 89.127 89.227 avr 89.152
Note the difference in radius of curvature is .062 inch. Also note, the "edge" is actually measured more than
an inch inside the edge, a limitation of the sphereometer.
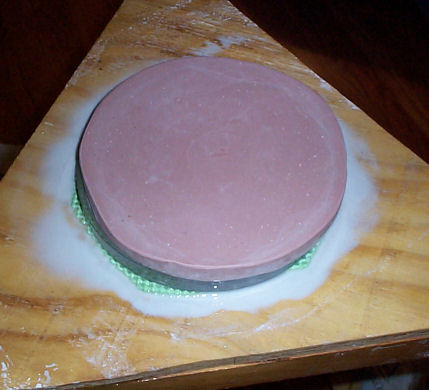
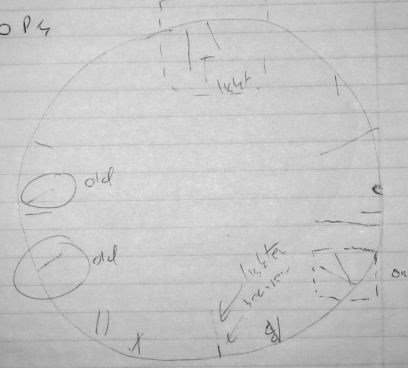
![[mirror before pitch]](06feb11.jpg) I inspected the mirror on Feb 11th, and sketched the results.
I inspected the mirror on Feb 11th, and sketched the results.
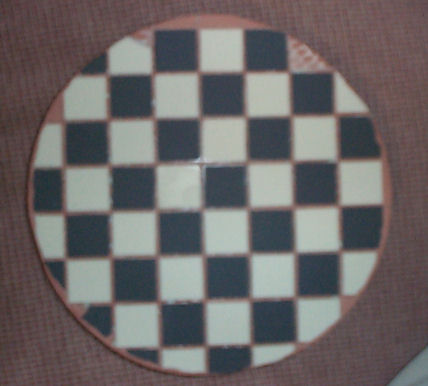
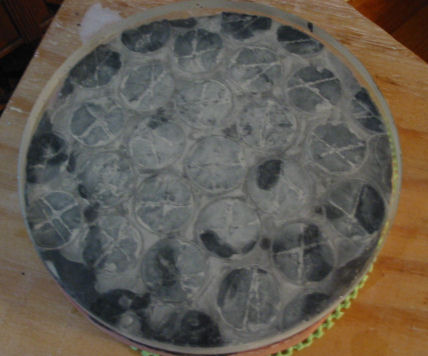
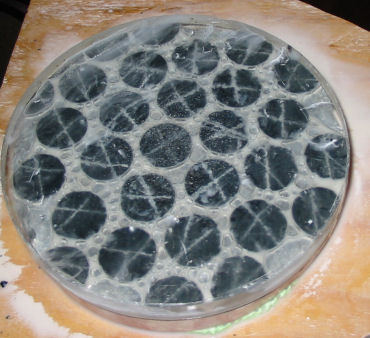
![[pitch tool]](30janlap10.jpg)
Pitch tool setup
Pitch tool use
![[pitch tool]](24feb06_t1.jpg) Feb 24:First polish at home with pitch tool. Just some quick notes, will fill in later.
Feb 24:First polish at home with pitch tool. Just some quick notes, will fill in later.
Cold press tool and mirror in container, no weights, 7PM-1AM. Seperated, cleaned mirror, put away.
1PM: prepared bath for tool and mirror
2PM: bathed tool and mirror and cerox at 90-95 degrees for 5-7 minutes.
Press tool on mirror 30 seconds w/body weight (100 lbs), then 20 lbs for 16 min until room temp (67 degrees)
2:42PM - Set up table, at 2:49 polishing - mirror on top. Sticky, so polished slowly and w/o pressure.
3:15PM - cold press mirror on top 30 lbs, 67 degrees F, 20 minutes
3:35PM - Wow! much smoother. Wet every 3-4 minutes, got sticky at 18 minutes in.
4:00PM - press 30 lbs for 15 minutes
4:15PM - tool on top, polish for 13 minutes
--- - press for 15 min at 30 lbs
--- - polish again, mirror on top. Gets sticky after 6 minutes. Give up, clean up.
5PM - done for day, about 40 minutes polishing done.
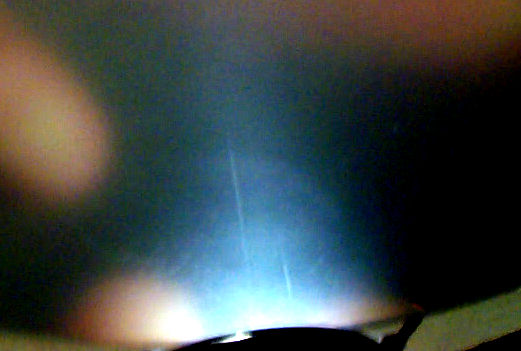
![[etched mirror]](26feb06.jpg) Feb 26: 5PM, examine mirror. OOPS! Let a puddle of Cerox on it, there is an
etched lake above the center and two small scratches from previous work.
"Lake" edge is actually fingernail detectable. But I'll polish it out. Scratches are light.
I clean the mirror more throughly and put away.
Feb 26: 5PM, examine mirror. OOPS! Let a puddle of Cerox on it, there is an
etched lake above the center and two small scratches from previous work.
"Lake" edge is actually fingernail detectable. But I'll polish it out. Scratches are light.
I clean the mirror more throughly and put away.
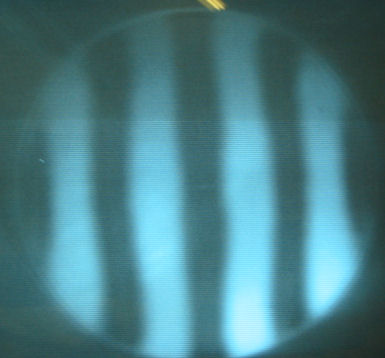
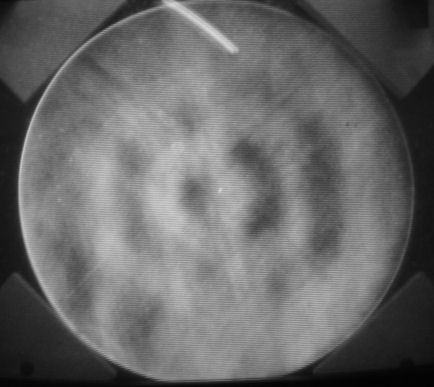
![[Feb 28 mirror]](27feb06_f2.jpg)
![[Feb 28 mirror]](27feb06_r2.jpg) Herb's 8" f/5.5:Something like an hour's pitch polishing (and about 45 minutes of pressing!) with 1-2micron CerOx
led to this Ronchigram for a mirror with about 80 thousandths variation in radius.
Herb's 8" f/5.5:Something like an hour's pitch polishing (and about 45 minutes of pressing!) with 1-2micron CerOx
led to this Ronchigram for a mirror with about 80 thousandths variation in radius.
170 inside
160
137
134
144 for a total delta of 36.
The prescription: do 10 minutes of a short COC stroke, for the edge; and NO MORE than 5 minutes of a 50% COC stroke to
reduce the hole.
Figuring #1
actual			deltas	perfect for 8in R=89.19, zones 1.789, 2.530, 3.098, 3.578, 4.0
243 inside		--		--
233			-10		22
208			-15		18
204			-4		18
220 delta 76		+16		18 delta 76.
The modified figuring stroke
90			--
165			75
175			10
180			5
209 delta 119		20
Figuring #2: lessons in stoke and surface
460			--
500			40
524			24
531			7
554 delta 94		23
Gordon commented "the surface is really dog-bisquit-y".See my notes about surfaces for details.
457			--
509			52
538			29
552			14
569 delta 112		17
By spending too much time in the inner zone, it deepened the center a bit. However, the outer zones are pretty nice (compare to the perfect numbers above). Gordon apologized for the misdirection, citing the late hour. But I'd already decided that work after midnight was not a good idea anyway. So I took this as an object lession and in good humor. "After all", I said, "the mirror is better, my stoke is better, and there's still surface work to do anyway". I cleaned up and left for the evening.
Figuring #3: lessons in Cerox and strokes
062	-
084	22
123	39
132	09
142	10	delta 80
237	-
272	35
310	38
319	9
331	12 delta 94
248	-
291	43
325	34
338	13
346	8	delta 98
205	-
246	41
277	31
290	13
298	8	delta 93
Parabolized by Gordon Waite
perfect	test1	delta	test2	delta	test3	delta
-	267	-	264	-	062	-
22	277	10	273	9	074	12
18	294	17	292	19	092	18
18	316	22	316	24	115	23
18	333	17	334	18	133	18
D=76	D=66	1/6.4	D=70	1/6.6	D=71	1/8.2
Resphere and parabolize again
Background
Glass History
Value
6" Thin Pyrex blank $21.95 (.8" thick)
7" Thin Pyrex $29.95 (1.0")
8" Thin Pyrex $38.95 (1.1")
9" Thin Pyrex $69.95 (1.25")
10" Thin Pyrex $89.95 (1.3")
11" Thin Pyrex $115.00 (1.35")
12" Thin Pyrex $145.00 (1.5")

6" Thin Plate $14.50 (.8")
7" Thin Plate $26.50
8" Thin Plate $29.95 (1.1")
9" Thin Plate $41.95
10" Thin Plate $61.95 (1.3")
12.5" Thin Plate $94.95 (1.5")
ATM books
Grinding
Summary of Grinding results by wets, grits, time
time - grit - wets - center/edge average
6 hrs 60 grit >140   119/127
6     80       110    86/91
2    120        60  91.7/90.3
3    220        30  90.7/90.6
.75  320        12  90.6/90.6
1    25u         4  90.6/90.5
7   12u/5u/3u  many 89.46/89.31
2   pads+Cerox ---    ???	tried during 12/5/3u fine grinding sessions
3   pads+Cerox ---  89.21/89.15	done after fine grinding
.7  ptch+1uCerox 4  ----

Typical 12/5/3 micron sessions: 2-5 minutes per wet
minutes       results
6-25  12u     remove scratches, longer for deeper
4-20   5u     smooth surface
10-20  3u     found more scratches, back to 12u

Last 12/5/3 micro session:
20	12	3 minutes/wet, to remove fingernail-depth scratch,  wash w/water & 5u in place
10	5u	3 min/wet, wash w/water & 3u in place
10	3u	3 min/wet, left with very fine scratches
Grinding in 1965
 Grit  #wets  abrasive/wet  time/wet total time
                teaspoons    minutes   hours

 80    20-30    1/2          1-4      2 to form curve
 80    15-20    1/2          2-4      2 to smooth curve
 120   12-15    1/2          5        1
 220    8-12    1/4          5        1
 320    6-10    1/4          5        1
 400    6-8     1/8          5-10     1
 600    6-8     1/16         5-10     1
 #305   6-8     1/20         5-10     1
 emery
Materials
Kerr Vel-Mix #4 dental plaster, pink, check dental supply houses
generic grade CerOx for fine grinding only
best of breed CerOx for polishing and figuring
Quality abrasives and pitch and cerox are ordered by Gordon from Salem Distributing.
Fine grinding summary
How to mix fine grinding compound
Sharpie Test
Polishing
Polishing out scratches
Avoiding scratches
Removing mirror from tool
Figuring
Pitch tool construction, first use
Pitch tool with brass-brush microfaceting
Pitch tool with screen microfaceting
Stroke management during figuring
Final surface issues
.1 micron CerOx
Reading the Coulder mask
Herb Johnson
New Jersey, USA
To email @ me, look at my commercial Web page for address